Showing posts with label recipes. Show all posts

Thursday, May 9, 2013

{Pumpkin Bars & Cream Cheese Frosting}


I think these kids are more better than not...but we certainly aren't 100% yet. There are still very, very, low appetites, lots of napping, and the occasional bathroom dash. Between that and three straight days of rain this mama needed a bit of a pick me up. The roads were flooded, even if they weren't too sick to be put in the car so I decided to scrape together some of our remaining groceries (please be better so we can grocery shop babies, we are out of everything!!), and I made these wonderful pumpkin bars with cream cheese frosting. I changed up the recipe a bit to make it a teensy bit healthier, but I mean...it's still cake and frosting. With a big glass of milk and a few episodes of Dawson's Creek (giggle), it was just the thing. Just excuse these iphone pictures, my camera is off on a fabulous adventure with my sister in Dublin. ;) (Yes, I'm waaaay jealous.)

Thank you all for your sweet words yesterday, it was good to hear from you ladies! <3 p="">

Thursday, January 24, 2013

{Everything Muffins}


I had a little bit of time to play in the kitchen this weekend and I came up with these muffins. They're so delicious I wanted to share the recipe.

Everything Muffins

Preheat oven to 350*F

1-1/2 cups flour {I use my gf flour mix, but you can substitute regular wheat flour too.}
1/2 cup milk {almond milk or water is fine too}
1/4 cup applesauce/coconut oil/vegetable oil
3/4 cup shredded coconut
2/3 cup chopped pecans
1 cup chocolate chips
2 tsp baking powder
1 tsp baking soda
2 tsp cinnamon 
2 tsp vanilla
1/2 tsp salt
2 eggs

Mix everything together and spoon into a well greased muffin tin. The batter is really more like a cookie dough, but it's fine! Bake for 14-18 minutes or until toothpick inserted in center comes out clean. Cool and enjoy!


Thursday, August 16, 2012

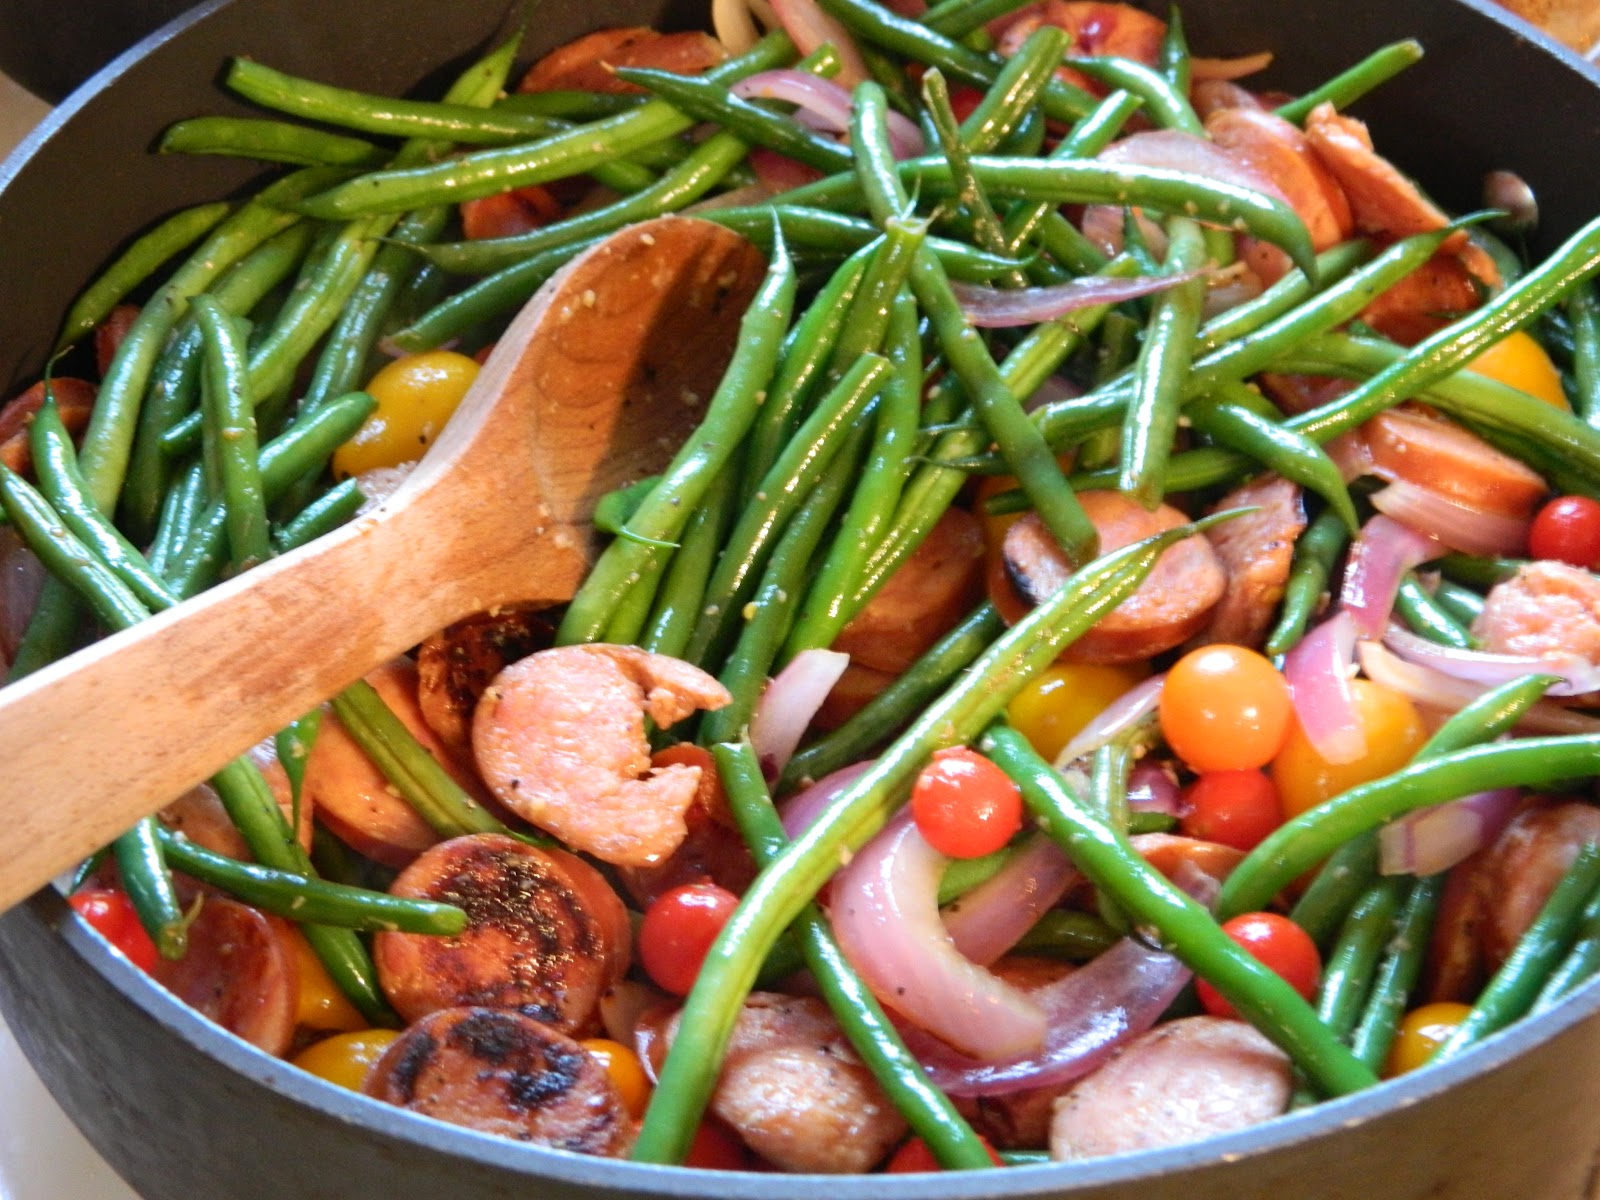
Summer Skillet Meal


So I have been making basically the same thing for dinner every night for a month...and since it's still quite popular, and oh-so-easy, I thought I'd share my formula err recipe. It really helps if you have an adorable helper, to keep you entertained with peek-a-boo and babbled versions of the "ABC's and "Happy Birthday"...if he has squishy baby dimples that's totally a bonus. {He was just about to go to bed here, hence the sleepy circles under his eyes.}

So this meal...it's very user friendly and requires almost no effort and zero planning. It usually looks something like this...

a few servings of meat (kielbasa is shown, but two chicken breasts, a sliced up steak, chicken sausage, pork sausage, Italian sausage--sweet or spicy, really any meat, will all work beautifully)

Set a large skillet on to heat while you slice up the meat (unless it's of the ground up variety), if it's lean I use a few tablespoons of butter or coconut oil to keep everything moving around and happy.

Add sliced meat + sliced red onion, let this start sizzling away over medium + heat while you chop up the other veggies. These may include any possible combination of peppers, broccoli, green beans, sugar peas, cauliflower, mushrooms, etc. Once sliced/chopped in a very minimal manner, toss the veggies in with the meat + onion and continue to stir occasionally. At this point a few key choices must be made...if you want to add some diced garlic or s&p, now is the time. I almost never add all three, and honestly tend to skip them all together...it depends mostly on the meat I'm using. If things start to look a little dry, I add a bit of whatever I'm drinking (water/wine/beer)... when the veggies are about half way cooked I like to add in a hand full or two of cherry tomatoes. It's really up to you and the contents of your fridge...I would say you are looking for one part meat, 3-4 parts veggies...the more colors the better! Just keep stirring it occasionally until your veggies are all tender crisp and your meat is cooked the way you like it. Once everything is basically finished, I like to pile a mountain of spinach on top of everything else and poke at it until the spinach has wilted down into it. I seriously add about a full pans worth of fresh spinach and it wilts down to fit quite nicely...it's just a little tricky to not end up dumping it everywhere. *ahem* Serve and enjoy! We really love this, it's easy to whip up, doesn't take long or much effort and there is a minimal kitchen mess made. I would say that in a large skillet this feeds three-four adults, depending of course on how hungry they are and exactly how much you make. I've been thinking it would be good served over brown rice or quinoa...or if you have leftovers of either you could just stir them into the mix. Let me know if you try it, and what you end up using!!

Thursday, July 19, 2012

Crispy Bliss


{Blackberries, blueberries, strawberries, rainier cherries, and some black apricots}


{3 cups oats, 1.5 cups sugar, 3/4cup flour, 1/4 cup cold butter} 


{Two sweet helper boys}


 {pre-made crusts...shhhh}


 {so, so pretty, and it smelled like summer in a bowl}


{That much topping made enough for two apple + the berry ...it's really the ratios that matter}

So much to do lately, we just needed to stop and do something just for fun this afternoon. The pump in our well seems to have died/been hit by lightening (!!) so our landlord spent the afternoon diagnosing the problem and seeing what would need to be done to fix it. He got a crisp. :) Did I mention the 100* temps he was working in?? I know it's his job and all, but I still think he earned a crisp! We needed to use some of the fruit up before it spoiled (it's so hard to keep produce for more than a few days, even in the fridge...this heat is just dreadful). 

Tomorrow is grocery/errand day, and then a quiet weekend ahead with my birthday on Sunday! I anticipate a lovely day at home, with knitting and baby hugs, and there are rumors of cake and surprises. *wink* I'm keeping my fingers crossed that the well pump will be all taken care of tomorrow so that we can get caught up on laundry and cleaning...I'm going a bit crazy and now that the water has been shut off over night, I'm feeling smothered by the urge to WASH THINGS. That's just the way it goes though, isn't it? Instead I'm forcing myself to focus on menu planning and grocery list making and the always exciting job of organizing school supplies...oh yeah, and there's that unpacking thing too...nearly finished with all of the boxes....really just those odd storage/out of season things and my crafting supplies are left! Both need to get weeded out again, even though we cut way back when we were moving. Less (stuff) is more (space for sanity) in the lovely farm house of ours...every box unpacked and every shelf tidied is another space that feels more like home than anywhere else we have ever lived...it's a good, happy feeling. And now it smells like apple crisp and new crayons so really, I think this day has been an overwhelming success, don't you think?


Monday, January 16, 2012

Monday in the Kitchen


Yesterday I had a visit from one of my oldest and dearest friends...always the best kind, don't you think? Well I was thinking what to have out for a bit of snacking, and I realized that all of my usual ideas are going to be a problem... over the last few months I have eliminated corn (in all of its forms), wheat and chocolate, add to that reducing my dairy intake and baking can become quite a tricky thing! Enter (one of) my totally amazing sister--when I first realized I needed to make the changes ~ due to nursing my sweet baby-with-a-tender-tummy ~ she got me the best cookbook EVER, Cooking for Isaiah. Most dairy free things these days are simply made with soy, which is something I'm not interested in...but this book suggests using either rice or coconut milk instead and you can't tell even the tiniest bit of difference in your baking! She also has come up with a great "gluten-free all purpose flour" that yields the nicest, fluffiest things I've ever baked. If you are interested in the gluten-free flour recipe, you can see it in the "Look Inside" feature on Amazon, other wise you can just substitute regular all purpose flour... why is that relevant? Because trust me, you want to make these...

These are THE BEST strawberry cupcakes ever!! Best cupcake ever? I don't want to sound like I'm bragging, so I'm going to just stick with best strawberry cupcake ever...REALLY!


 Strawberry Cupcakes with Strawberry Frosting

For cupcakes...
1-1/2 cups all purpose flour
2 teaspoons baking powder
1/2 teaspoon salt
1/2 cup strawberry puree (about 5 ounces of strawberries, I just tossed them in the blender with a little strawberry jam because I was a bit short...if you don't need the jam just add a bit of sugar)
1/2 cup rice milk (or regular milk)
2 teaspoons vanilla extract
3 drops red food coloring (I left this out)
1/2 cup shortening at room temp. 
1 cup sugar
 2 large eggs at room temp. (Mine were not room temp)

1) Preheat the oven to 350* and line your muffin pan with papers. 

2) In a small bowl, whisk together the flour, baking powder and salt. 
In another small bowl, combine the strawberry puree, milk, vanilla and food coloring.

3) In a large bowl and using an electric mixer, beat the shortening on medium-high speed until fluffy, about one minute. Add the sugar and beat until fluffy, about 2 minutes (scrape the sides as needed). 
On medium speed, beat in the eggs, one at a time, until combined. Alternately add the flour mixture and the strawberry mixture, beginning and ending with the flour mixture and beating until just combined. Pour the batter into the prepared muffin pan until each cup is two-thirds full (ahem...I am a chronic over-filler). Bake until the cupcakes are springy to the touch and a toothpick inserted in the center comes out clean, 18-20 minutes. Let cool completely In The Pan set on a wire rack.

For frosting...
1 cup shortening, at room temperature 
(I used butter...because I'm French, and shortening is not my thing in frostings)
2-3/4 cups powdered sugar *
1/2 cup strawberry puree
1/4 teaspoon salt
sprinkles for the top, should you happen to have them handy

To make the frosting, in a large bowl and using an electric mixer, beat together the shortening (butter), powdered sugar, strawberry puree and salt on medium-high speed until fluffy, pipe or spread over the cooled cupcakes; top with sprinkles. Enjoy!!

*A note for anyone who is also corn-free (although I might be the only person in the universe...), or if you use organic sugar and want to turn it into organic powdered sugar... most powdered sugar has cornstarch in it. Lame. I recently learned that I can make my own however, in the blender. Just substitute equal amounts of regular sugar and pulse until it's powdered. I've heard it can scratch up plastic though, so consider that before you use a plastic food processor or blender... 


What is happening in your kitchen today? Please leave a comment, or if you would like to share on your  blog, please leave us a link so we can see! (And a link back to here is great too...)


Monday, January 9, 2012

Monday in the Kitchen


This morning I wanted to share a favorite new snack around here. I've seen the idea all over pinterest, and after looking over a few variations I came up with these. The kids are calling them "snack balls" and are scarfing them down at every opportunity, which is great because between the two of them it can be hard to find healthy snacks they will both eat! This is the first time we've made them, but I expect they will become a staple around here...there are so many variations they will never get old! They have the added bonus of being something Jenny can learn to make very soon, which is great.

 Peanut Butter Snack Balls

1 cup peanut butter
1 cup honey
1 cup powdered milk
1 cup rolled or quick oats 
(I think you could just use 2 cups oats instead of powdered milk for a dairy free option, but I haven't tried it yet)
about 3/4 of a cup whatever yummy thing you want
(here I did cinnamon chips, but you could do chopped nuts, raisins, mini chocolate chips, coconut etc.) 

Combine all ingredients and roll into 1" balls, refrigerate for at least 2 hours, and store in an air tight container. I got about three dozen out of them and two satisfy my kids at snack time, bringing a blessed break from the constant refrain of "I'm hungry!" ;-)

What is happening in your kitchen today? Please leave a comment, or if you would like to share on your  blog, please leave us a link so we can see! (And a link back to here is great too...)

Monday, June 14, 2010

Homemade Bread

Lately I've been trying to establish a weekly rhythm to help us get everything done. One thing I noticed was that I would plan to bake a few things (including bread) as part of our weekly menus, for sandwiches and the like, but then when it wouldn't happen I would have to scramble for an alternate lunch plan. Well...no more! I think Monday is the perfect day for baking around here. I'm always in the kitchen anyway, since there are usually some dishes to catch up on after the weekend, and since I'm still feeling a wee bit lethargic after two days of quietER to do lists, baking seems to be just the thing. This week I tested a new bread recipe that I really love! I have one other I would like to test, but I'm about 95% sold on this one...I just want to check the other out because well...you never know! ;) So...found on all recipes, here is my current favorite...

Ingredients

  • 1/2 cup warm water
  • 3 (.25 ounce) packages active dry yeast
  • 1/4 cup bread flour
  • 1 tablespoon white sugar
  • 2 cups quick cooking oats
  • 2 cups whole wheat flour
  • 4 1/2 cups warm water
  • 1 1/2 tablespoons salt
  • 2/3 cup brown sugar (I used turbinado)
  • 2/3 cup vegetable oil
  • 10 cups bread flour
In the mixing bowl of an electric mixer, stir together 1/2 cup warm water, 1 tablespoon sugar, 1/4 cup bread flour, and yeast. Let grow for about 5 minutes. It will bubble almost immediately.
Measure oats, 4 1/2 cups warm water, whole wheat flour, salt, 2/3 cup sugar, and 2/3 cup oil into the mixing bowl. Mix on low speed with a dough hook for 1 to 2 minutes. Increase speed slightly, and begin adding bread flour 1/2 to 1 cup at a time until dough pulls away from sides of bowl. Humidity determines how much flour you need before the bread pulls away from the edge of the bowl. It is normal for the dough to be sticky.
Place dough in an greased bowl (*note* I had to use my two largest mixing bowls, and it really really filled them once it had risen! One bowl is certainly not large enough unless you have a Really Really mammoth fit-a-two-year-old-in-it bowl), and turn to coat the surface. Cover with a damp cloth. Let rise in a warm spot for 1 hour, or until doubled in size.

Divide dough into 6 pieces. Shape loaves, and place in greased 8 x 4 inch pans. Let rise until dough is 1 inch above rim of pans, usually 1 hour. (*note* clearly, I did this a bit differently, since I only have 2 loaf pans...I would really love to get some of these to expand my collection, but that's just currently not an option...so we have a variety to chose from!)

Bake at 350 degrees F ( 175 degrees C) for 30-35 minutes, or until tops are browned. Let cool in pans for 10 minutes, and then turn out onto wire racks to cool completely.

Tuesday, May 25, 2010

Cinnamon Rolls

A few weeks ago I had decided that my personal mission for the summer was to find a go-to, simply amazing, cinnamon roll recipe. Two recipes in and I've already got it! :) My friend Sarah Jane over at Romantic History shared this recipe here, and they are every bit as good as she makes them sound! I made them whole wheat, and they did beautifully. My only advice is to not skimp on the 10 minutes of kneading (although my arms sure wished I would!!), the dough becomes magically soft and elastic when you're approaching the ten minute point, it completely effects the whole process. :) Since my Grammy asked, I'm re-posting my own cook book's version here...

Sarah Jane's Maple Cinnamon Rolls

Ingredients:
1 and 1/3 c. milk
2/3 c. maple syrup
2/3 c. soft butter
2 eggs
1 1/2 tsp. salt
6 c. flour (I used white whole wheat)
2 pkg. yeast

Filling:
1 c. packed brown sugar
4 TB flour
3 TB cinnamon
1 stick cold butter

In a saucepan, warm milk, syrup and butter til butter is melted - do NOT boil. Cool to a warm temperature beneficent to yeast. When nicely warm to the touch, put in yeast. Stir in eggs and salt. Mix in 3 cups of flour. Add enough remaining flour to make a stiff dough. Turn out onto board or floured counter and knead for 10 minutes. Pat dough into ball, place in greased bowl and cover with a towel.

Let rise for 1 hour.
Punch dough down and divide into two. Roll each ball into a rectangle, appx. 12" x 18". Combine filling ingredients in bowl, cut in butter to make a crumbly mixture. Spread filling evenly over rectangles of dough. Roll up each rectangle into a fat log. Cut each log in half, then cut each half into 5 rolls. Place 15 rolls on a baking sheet. The remaining 5 rolls put into a separate baking sheet. Cover and let rise for forty minutes.
Preheat oven to 375. Bake rolls for 25-35 minutes or until golden brown on top. Remove from oven and top with a clean towel. (if you don't do this the rolls will get hard on top). Let rolls cool beneath towel while you make the icing.
Icing:
1 cup powdered sugar
3 TB butter, melted
3 TB maple syrup
1 to 2 TB milk
Combine the powdered sugar, melted butter and syrup in a bowl. Add in enough milk for desired consistency. Spread over warm rolls and let rolls cool, uncovered, completely. When cool put into an air tight container.

These have been a HUGE hit over here, so I think they will become our Saturday breakfast. I can make them up on Friday afternoon, so there's not any coin flipping for who has to make breakfast (vs. sleeping until b'fast is done), which I'm sure Joseph will like, since *somehow* he always draws the short straw on that one... ;-)

Tuesday, January 12, 2010

It's that time of year...

You know, when you've been running the heat for a few months, and the air is dry. The last few weeks here have been crazy, it feels like we're drinking water constantly (I drink my entire water bottle at night and wake up thirsty!), dry skin, static-y hair, you know the drill. In addition to a humidifier in one of the bedrooms (at one end of the house), I've been running my stove top potpourri from sun up 'til bedtime. Not only does it help get water into the air, but it smells lovely too (even Anthony says so!). Unfortunately it doesn't exactly photograph well, but that's okay. It's pretty flexible, I've listed the whole "recipe", but I've been known to skip the apples, use orange essential oils, and lemon juice. ;)

Stove Top Potpourri

Into a 2qt. sauce pan place, one sliced lemon (or generous splash of lemon juice), peals of about two oranges (or about 8 drops of essential oil), and either apple peals and cores or you can use up those "dead" (but not rotten or moldy) apples, just chunk up- core and all- and toss in (Granny Smith looks especially pretty), then you want to add some cloves, some cinnamon, and I like to add some nutmeg and allspice too, but that's up to what you like. Whole cloves or ground are fine (check your local bulk food store for these, since they tend to be way WAY cheaper there), and you can use ground cinnamon, or cinnamon sticks that have been broken up. Fill pan to about 3/4" from the top with water once everything is in the pan and put onto a back burner at about a "4", or just onto the low side of medium. Once it starts boiling keep an eye on it, and add water throughout the day. You will need to refresh the spices every 24 hours or so, but you can just add to what you've got for about a week at a time. Just continue to add fruit peals or whatever as you notice the scents weakening. Just don't forget to watch it, you don't want to loose a pan! I find I have to add to mine every hour and a half or so. I have added a note to my front door to remind myself to turn it off before we leave, since it's so easy to just get used to it when you have it going for days. Tinker with it, make it smell like you would like, and enjoy!


ETA~ I have all sorts of knitting to show you, but I haven't had the chance to get any pictures yet; hopefully today! So I think you'll be getting to see some FO's (finished objects, as opposed to UFO's, which would be un-finished objects) for WIP Wednesday!

Wednesday, December 2, 2009

A New Favorite

(picture from here)
I made this for dinner last night while on the phone with my very best friend. :) This means two things, 1) I got to talk to Anne for 1-1/2 hours! -and 2) This is so easy that you can do it while paying no attention at all. ;) This is definitely one of my favorite recipes now!

Chicken and Rice Pot Pie

1 sheet of frozen puff pastry (you buy it pre-made, and I just defrosted one sheet in the microwave for about 1.5-2 minutes at 50% power, just until it unfolds without breaking)
4 boneless skinless chicken breasts (I had them pre-baked in the freezer, so I just cut those up into cubes) cut crosswise into 1/2" pieces
salt and pepper
4 Tablespoons unsalted butter
2 teaspoons flour
1 cup instant rice (they say white, but I used brown and really loved it)
1 3/4 c. chicken broth
1/2 c. heavy cream
1 cup frozen veggie mix
(They say 3 scallions, but I forgot them and liked it without)

Okay, here is the actual recipe, and I'll just add what I changed in parenthesis.

1) Cut puff pastry sheet into 6 evenly sized pieces, and bake on lined (parchment or a non stick mat etc.) baking sheet until golden brown and crisp, about 15 minutes.

2) Meanwhile, pat chicken dry with paper towels and season with salt and pepper. Melt 1 Tablespoon of the butter in large skillet over medium-high heat. Cook half of chicken until no longer pink, 1 to 2 minutes per side; cut into cubes and transfer to medium bowl. Repeat with additional 1 Tablespoon butter and remaining chicken. (I already had cooked chicken, so I just cubed and and set it aside.)

3) Add flour and remaining butter to (now) empty skillet and cook until golden, 1 to 2 minutes. (I just used a bit over 2 Tblsp. of the butter since I didn't need to cook the chicken). Stir in rice, broth and cream and bring to boil. Reduce heat to medium and simmer, covered, until rice is nearly tender, 3 to 5 minutes. Stir in frozen veggies (and scallions), and chicken along with any accumulated juices. Simmer until sauce is thickened, about 3 minutes. Season with salt and pepper. Top with puff pastry and serve.

So quick and easy! I really loved it. ALLOT. I might try tossing in an egg or two, for more of a stir-fried rice feel, because, well, I just love it! I like this so much in fact that I might just make up a double recipe on the weekend and eat if for lunch all week. Love it!! Funny fact: I used to hate rice, like, I just couldn't eat it. E.V.E.R. Then, when I was pregnant with Jenny I started having this weird craving for pork fried rice...which turned into anything involving rice. Now it is my side dish of choice and I can't stop eating it! Weird, huh?

Saturday, November 7, 2009

Family Night

So coming up with brilliant things to blog about today proved to be somewhat difficult. Joe spent the day working on a rather huge project (more on that in another post soon), so the kids and I had the day free to go play. We spent a few hours at my mom's; now that everyone is healthy again we can finally start visiting again. :) After that we went down to WalMart to look at fabric. I'm working on a fall/winter wardrobe "collection" (again, more on that soon!) and I was looking for some pretty fabrics...you see the only problem is that WalMart has several lines of fabric that they stock and rarely do they get anything new. So, since I've been buying fabric from them for the last oh, 10 years, I feel like at some point I have worn every version of calico they sell. :) So in order to not completely let the kids down, I started talking about the new and exciting concept of "Family Night" that we were going to start this evening. Of course Jenny wanted to know all about it, so I told her that she and Daddy would be making pizza and that after we could watch a special movie or play a game or something else fun. She really liked the game idea and asked what we would play...at that point I quickly realized that I had miscalculated one thing... we only had big people games. So after a quick browsing of of the game isle, we found that there is a line of games by one of their favorite illustrators, Eric Carle. They just had one of them (The Very Hungry Caterpillar), but it looks like Target has several more that I think we might start "collecting"...maybe a few as family Christmas gifts? We really had fun with the Caterpillar game, Jenny especially. :)

Here are links for anyone interested...

Other Games (not Eric Carle)


And this pizza dough is really good, really easy, and doesn't need any time to rise!

Pizza Crust

1 cup of warm water
1 teaspoon salt
1 teaspoon sugar
2 1/2 teaspoons of yeast (one package)
2 1/2-3 cups of flour

Preheat oven to 425*. Put all of the ingredients into a bowl and mix well. Pat out onto a greased pizza pan and add your toppings of choice. Bake for 20 minutes until the crust is golden brown. Yield 1 large pizza. Enjoy!!


ps) A blog I love, Sew Liberated (side bar link) will be hosting an exchange that looks like lots of fun, so go over and take a look!

Tuesday, November 3, 2009

My favorite chili

This morning I woke up feeling more than a wee bit under the weather. Not at all what I had been planning on, but I guess with everyone else in the world being sick right now, we were bound to get our turn at some point. There are two kinds of flu, and rumors of strep in our area...I hope it's none of those, but if it is, I find myself hoping for flu instead of strep... I guess we'll know in a few days! Maybe it's just a fluke. So anyway, I wanted to share my favorite chili recipe with you all today. It is my fall back meal, because it is so easy and fast. If you brown hamburger and freeze it ahead of time then it is also one of those one pan meals. :) Between the grocery store, and taking advantage of a food co-op sale, I can find most of these things organically, so don't see cans and despair (if you eat organically that is!).

My Mom's Chili

2 cans dark red kidney beans
2 cans black beans
2 cans corn
2 large cans diced tomatoes
1 (small) can green chilies (I think they come diced?)
2-3 Tbsp chili powder
1-2 tsp cumin
1 lb. cooked ground beef

Mix all ingredients together in a large pot and bring to a boil. Turn down and allow to simmer for an hour or two. I always serve this over cornbread. I haven't found a very good recipe yet, so I use my favorite mix, the blue Jiffy box. If you have a good recipe let me know!! This is also really good with sour cream or shredded cheese on top.

I'm off to go pull together the coffee before Bitty gets up (btw, Bitty is Joe's sister who is currently living with us while she goes to school). Then I think the day will be one of those days when you have to just go into survival mode before breakfast. :) Fresh sheets, tidy a room or two to be sick in, read lots of stories (especially those new ones, Thank you Grammie!! Bob hasn't put his new dog book down!) and try to get healthy before we get sicker.


Tuesday, August 18, 2009

Speaking of Food...

This is a pizza I made last week. Just a simple pizza crust, covered with bbq chicken (I baked the breasts, then chopped them and tossed them with bbq sauce), zucchini, summer squash, tiny red onions and fiesta blend cheese. On the very top I added orange cherry tomatoes (my favorite!) and baked the whole thing. It was SO good! Very summer-time-y. :)


Friday, June 5, 2009

The Second Best Macaroni and Cheese

Okay, so the very best is the kind my mom makes with a real, separate white sauce....it's incredible. :) Unfortunately, it's a bit time consuming...not hard really, but it doesn't fit into my 5 minutes of cooking time. This recipe however, does. Quick, easy, and a definite favorite around here. It's one of the very few non-dessert things that Jenny asks for seconds of. :)

Second Best Macaroni and Cheese

1 lb of uncooked macaroni
1lb of grated cheese (cheddar is best, but you could use moz, or jack, etc.)
4 cups of milk
salt and pepper
1 medium onion, chopped (opt)

Spray your baking dish with a non-stick cooking spray. I use my 13x9, but it would probably fit fine into a medium-large corning ware type dish too. Pour in your uncooked pasta, then mix in your grated cheese, salt and pepper (and onion if you're using it). Pour your milk evenly over the top, then don't stir! Just make sure to press any heaps of pasta out flat so that nothing is to far above the milk--it wont cook and will just stay hard. Don't go crazy though, a bit of crunch is nice. :) At this point I like to sprinkle it with something like Italian seasoning. Not to much, but a little adds a nice flavor. My mom likes paprika. Pop it into the oven at 350* for about 1 hour. Just test the pasta with a fork (I like to taste, it just to be sure the inside is cooked), the cheese should be a nice light to medium brown. I think it's best served warm, but some of my brothers claim that it's just as good cold. They are under 13 though... :) Enjoy!

Chocolate!!

This is another wonderful cookie recipe originally found at Jenny's blog, Blessed Femina. They are a simple cookie, but oh-so-good. And they look so cute on the cookie sheet before they bake. :) And of course, being cute is a big part of being a good cookie. :)
Grammy's Chocolate Cookies

taken from~ Martha Stewart Living

  • 2 cups all-purpose flour
  • 3/4 cup Dutch cocoa powder
  • 1 teaspoon baking soda
  • 1/2 teaspoon salt
  • 1 1/4 cups (2 sticks plus 4 tablespoons)
  • unsalted butter, room temperature
  • 2 cups sugar, plus more for dipping
  • 2 large eggs
  • 2 teaspoons pure vanilla extract

Sift together flour, cocoa powder, baking soda, and salt. Set aside.
In the bowl of an electric mixer fitted with the paddle attachment, beat butter, 2 cups sugar, and eggs on medium speed until light and fluffy, about 2 minutes. Add vanilla, and mix to combine. Gradually add dry ingredients, and combine with mixer on low speed. Cover bowl with plastic wrap, and chill until dough is firm, about 1 hour. (Longer is fine.)
Preheat the oven to 350 degrees. Line baking sheets with Silpat baking mats. Roll dough into 1-inch balls. Dip top of each ball into sugar. Place on prepared baking sheets about 1 1/2 inches apart. Bake until set, about 8 minutes. Cool on baking sheets for 5 minutes before transferring to a wire rack to cool completely.

Wednesday, June 3, 2009

White Chocolate Macadamia Nut Cookies

A few weeks ago, I was over at one of my favorite blogs (Blessed Femina), and saw this recipe for one of my favorite cookies. Yesterday I finally got to try it, and it is SO good! Let me know what you think! (sorry for the lack of picture...I'll try to add one later if I get a minute!)

White Chocolate
Macadamia Nut Cookies
~taken from~
The Village Baker's Wife
by Gayle & Jim Ortiz with Louisa Beers


These cookies are similar to blondies, and the addition of macadamia nuts makes them even more rich.

1 1/2 cups butter at room temperature
1 1/4 cups granulated sugar
1 1/2 cups firmly packed brown sugar
2 large eggs
1 tsp. pure vanilla extract
4 cups all-purpose flour
2 tsp. baking powder
1 tsp. baking soda
1/4 tsp. salt
12 oz. white chocolate cut into 1/2 inch chunks,
or 1-1 1/2 cups white chocolate chips
1 1/4 cups unsalted macadamia nuts

Preheat the oven to 325 degrees.
Line 2 baking sheets with parchment paper.
In the bowl of a tabletop mixer fitted with the flat beater, cream
the butter and both sugars until smooth. Add the eggs, one at a time,
waiting before the first is incorporated before adding the second.
Mix in vanilla.

In a separate bowl, combine the
flour, baking powder, baking soda, and salt.
Add the dry ingredients to the creamed mixture
and mix just until incorporated.
Transfer the batter to a large bowl and, with a
rubber spatula, fold in the white chocolate
and macadamia nuts by hand.

Scoop out 2 T. size balls of dough and drop them at least 2 inches apart
on a baking sheet. Bake on the center wrack in
the oven for 12-13 minutes,
or just until the cookies are slightly golden.
Don't over bake these cookies they should be soft and chewy!
Enjoy!!